
تصویر: Step-by-Step Guide to Growing Alfalfa Sprouts at Home
شائع شدہ:
آخری بار اپ ڈیٹ کیا گیا: 13 مئی، 2026 کو 4:28:51 PM UTC
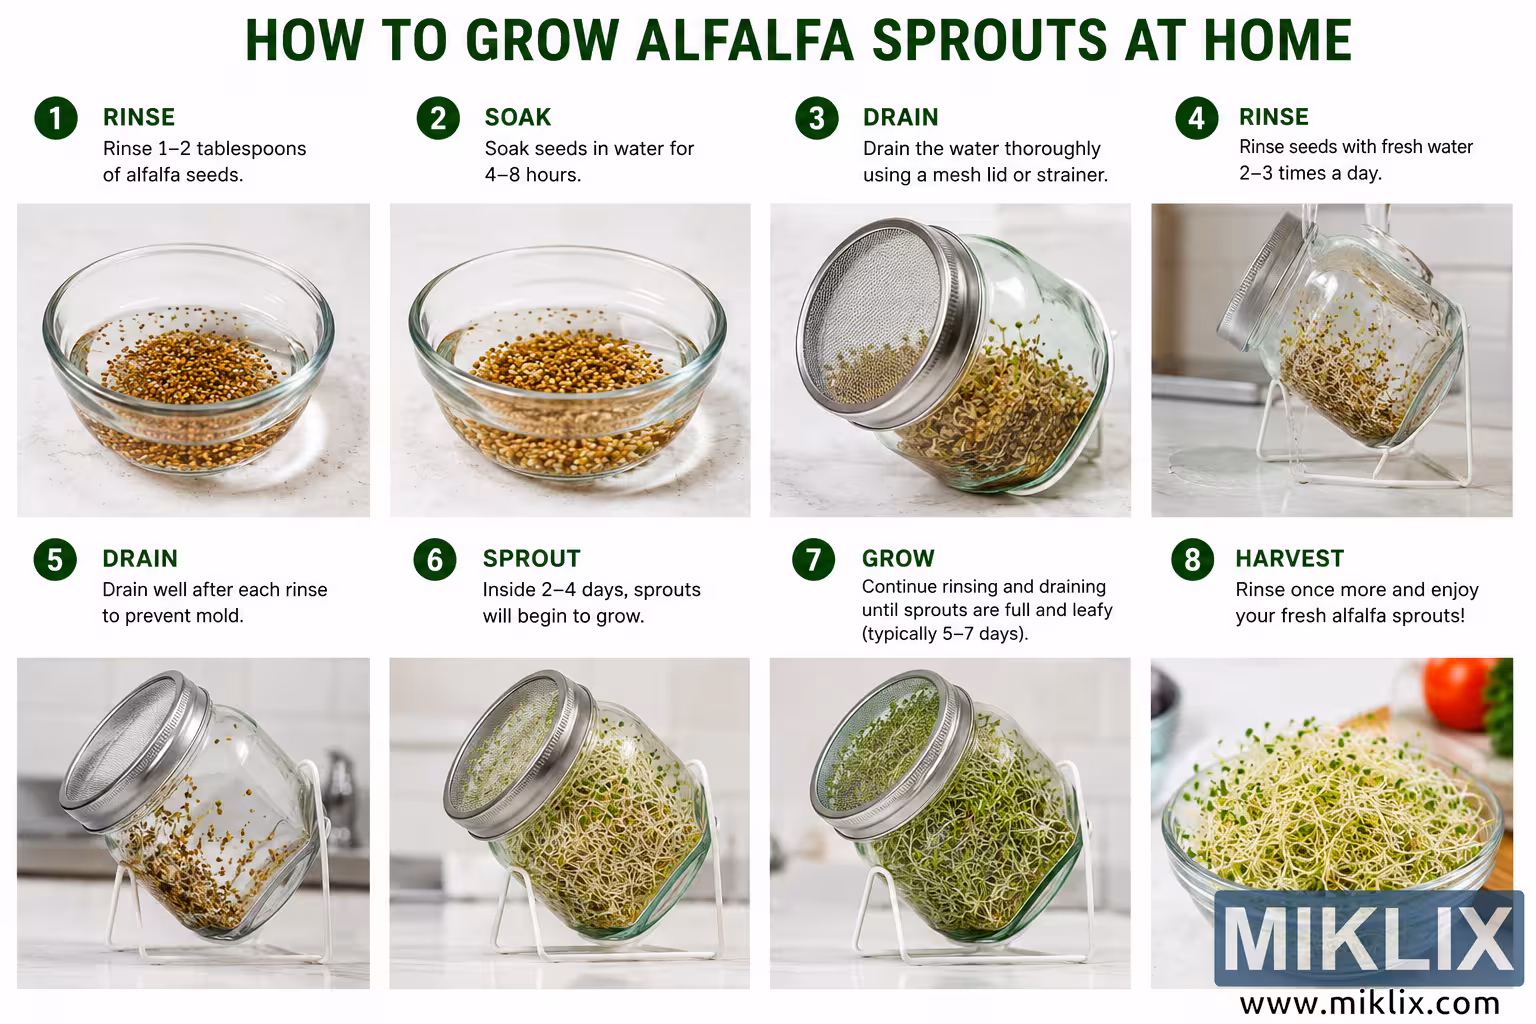
Learn how to grow fresh alfalfa sprouts at home with this easy step-by-step visual guide. The infographic demonstrates rinsing, soaking, draining, sprouting, growing, and harvesting alfalfa sprouts using a simple glass jar method.
Step-by-Step Guide to Growing Alfalfa Sprouts at Home

اس تصویر کے دستیاب ورژن
ذیل میں ڈاؤن لوڈ کے لیے دستیاب تصویری فائلیں کم کمپریسڈ اور زیادہ ریزولیوشن ہیں - اور اس کے نتیجے میں، اعلیٰ معیار - اس ویب سائٹ کے مضامین اور صفحات میں سرایت کردہ تصاویر سے، جو کہ بینڈوتھ کی کھپت کو کم کرنے کے لیے فائل کے سائز کے لیے زیادہ موزوں ہیں۔
باقاعدہ سائز (1,536 x 1,024)
بڑا سائز (3,072 x 2,048)
بہت بڑا سائز (4,608 x 3,072)
اضافی بڑا سائز (6,144 x 4,096)
مزاحیہ طور پر بڑا سائز (1,048,576 x 699,051)
- ابھی بھی اپ لوڈ ہو رہا ہے... ;-)
تصویر کی تفصیل
This landscape-oriented infographic presents a complete step-by-step guide for growing alfalfa sprouts at home using a clean, bright, and easy-to-follow visual layout. The design features eight numbered stages arranged in a neat grid with green headings, short instructional text, and realistic photographic illustrations showing each stage of the sprouting process. A large dark green title at the top reads “How to Grow Alfalfa Sprouts at Home,” clearly introducing the topic.
The first panel, labeled “1 Rinse,” shows a small clear glass bowl filled with water and dry alfalfa seeds. The seeds appear golden-brown and are partially submerged while resting on a light kitchen countertop. The accompanying instruction explains that one to two tablespoons of alfalfa seeds should be rinsed.
The second panel, labeled “2 Soak,” displays the same bowl after the seeds have absorbed water. The seeds appear slightly larger and more hydrated. The instruction states that the seeds should soak in water for four to eight hours.
The third panel, labeled “3 Drain,” features a large clear glass sprouting jar fitted with a fine mesh lid. The jar is tilted sideways on a white metal stand while excess water drains away. Small early sprouts are visible inside the jar. The instruction explains that the water should be drained thoroughly using a mesh lid or strainer.
The fourth panel, labeled “4 Rinse,” shows fresh water being poured into the tilted jar to rinse the seeds. Tiny roots and early sprouts are visible inside. The accompanying text instructs the viewer to rinse the seeds with fresh water two to three times daily.
The fifth panel, labeled “5 Drain,” again shows the jar positioned upside down on its stand for proper drainage. More sprouts are visible than in earlier stages. The instruction notes that draining well after each rinse helps prevent mold.
The sixth panel, labeled “6 Sprout,” shows noticeable white sprout growth inside the jar after several days. The sprouts are longer and beginning to fill the jar. The text explains that sprouts begin growing within two to four days.
The seventh panel, labeled “7 Grow,” displays the jar densely packed with mature green alfalfa sprouts. The sprouts appear fresh, leafy, and vibrant. The instruction explains that rinsing and draining should continue until the sprouts are full and leafy, typically after five to seven days.
The eighth and final panel, labeled “8 Harvest,” presents a glass bowl filled with finished alfalfa sprouts ready to eat. The sprouts are pale green with delicate leaves and thin white stems. Softly blurred vegetables in the background suggest freshness and healthy cooking. The final instruction encourages rinsing the sprouts one more time before enjoying them.
Overall, the infographic uses a bright white kitchen setting, natural lighting, green accent colors, and realistic food photography to create an approachable educational visual. The process is clearly organized and visually demonstrates each stage from dry seeds to fresh edible sprouts.
تصویر سے متعلق ہے: Alfalfa Sprouts: Complete Guide to Health Benefits