
Image: Step-by-Step Guide to Planting a Young Hazelnut Tree
Published: January 11, 2026 at 1:58:30 PM UTC
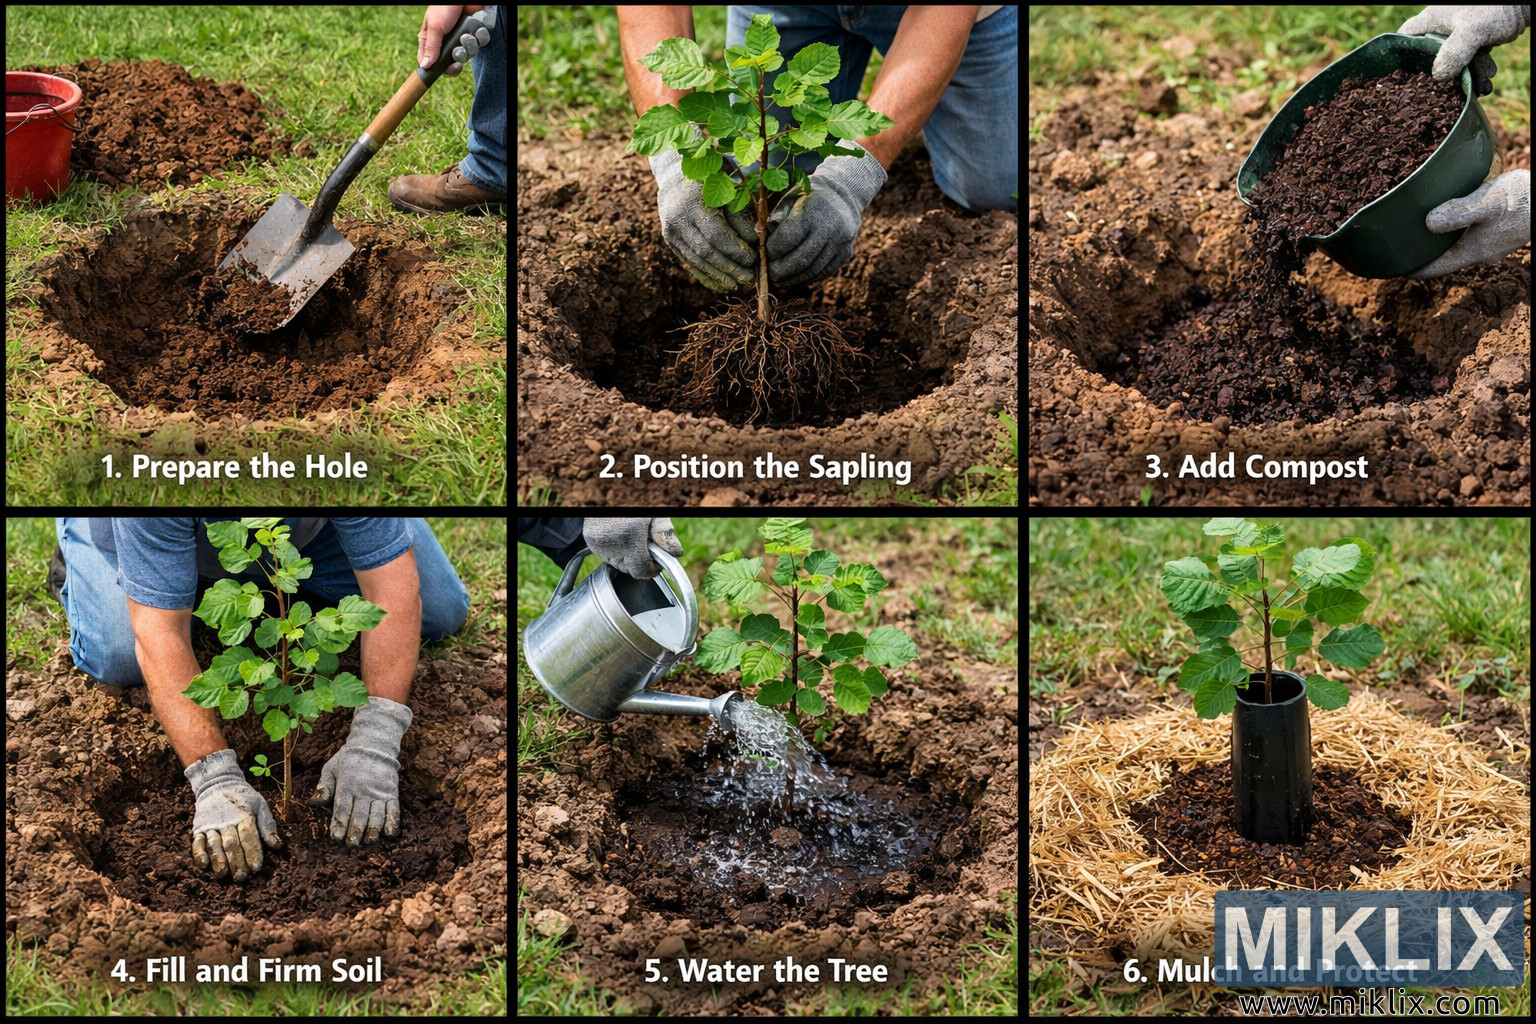
High-resolution visual guide illustrating the complete step-by-step process of planting a young hazelnut tree, including hole preparation, positioning the sapling, adding compost, watering, and mulching.

Available versions of this image
The image files available for download below are less compressed and higher resolution - and as a result of that, higher quality - than the images embedded in articles and pages on this website, which are more optimized for file size in order to reduce bandwidth consumption.
Regular size (1,536 x 1,024)
Large size (3,072 x 2,048)
Very large size (4,608 x 3,072)
Extra large size (6,144 x 4,096)
Comically large size (1,048,576 x 699,051)
- Still uploading... ;-)
Image description
The image is a high-resolution, landscape-oriented photographic collage that visually explains the step-by-step process of planting a young hazelnut tree. It is arranged as a structured grid of six rectangular panels, laid out in two rows of three, each panel representing a distinct stage of the planting process. The overall color palette is natural and earthy, dominated by rich browns of soil, fresh greens of grass and leaves, and neutral tones of gardening tools and gloves. Natural daylight illuminates all scenes evenly, creating a realistic and instructional gardening atmosphere.
In the first panel, titled "Prepare the Hole," a freshly dug circular hole is shown in a grassy garden area. A metal shovel with a wooden handle is partially embedded in dark, loosened soil, indicating active digging. The edges of the hole are clean but natural, showing layers of earth, while a small pile of excavated soil sits nearby. This panel establishes the initial preparation step.
The second panel, "Position the Sapling," focuses on a young hazelnut sapling being carefully lowered into the center of the hole. A person wearing gardening gloves supports the slender trunk and exposed root ball. The roots are clearly visible, spreading slightly, and the sapling’s healthy green leaves suggest vigor and freshness. The framing emphasizes correct placement and care.
In the third panel, "Add Compost," a container tilts as dark, nutrient-rich compost is poured into the hole around the roots. The contrast between the compost and the surrounding soil highlights soil improvement. The action conveys enrichment and preparation for healthy growth.
The fourth panel, "Fill and Firm Soil," shows gloved hands pressing soil back into the hole around the sapling. The tree now stands upright, partially supported by compacted earth. The focus is on stabilizing the plant and removing air pockets, with soil texture clearly visible.
The fifth panel, "Water the Tree," depicts a metal watering can pouring a steady stream of water onto the soil at the base of the sapling. The soil appears darker and moist, illustrating hydration and root settling. The sapling remains centered and upright.
The final panel, "Mulch and Protect," shows the planted hazelnut tree surrounded by a neat layer of straw mulch. A protective tube encircles the lower trunk, suggesting defense against pests and weather. The tree stands alone, well-established, completing the planting sequence. Overall, the image functions as a clear, practical visual guide for gardeners.
The image is related to: A Complete Guide to Growing Hazelnuts at Home