Image: Maple Tree Planting Guide
Published: August 22, 2025 at 9:07:54 AM UTC
Last updated: September 28, 2025 at 8:27:46 AM UTC
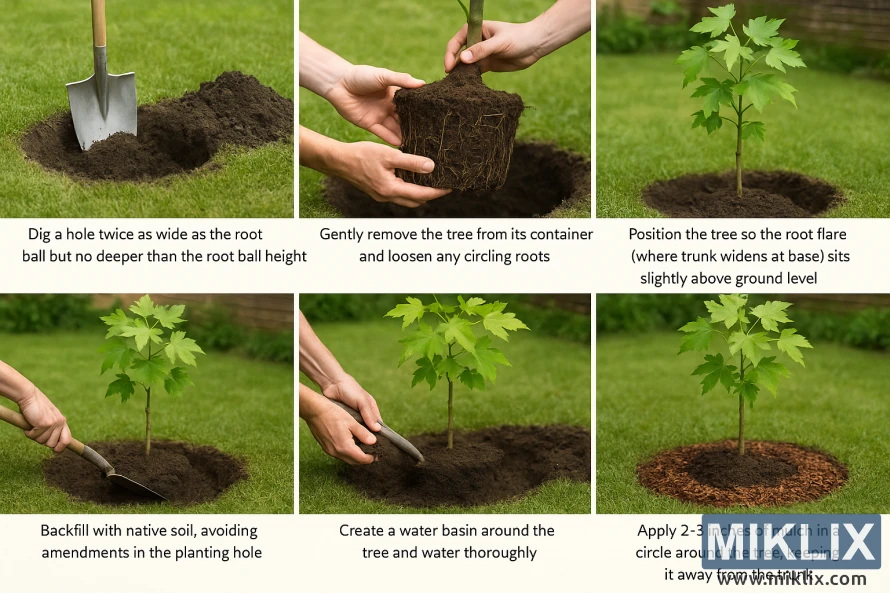
Composite instructional image with six steps for planting a young maple tree, from digging and positioning to watering and mulching.
This carefully constructed instructional image provides a step-by-step visual guide to planting a young maple tree, demonstrating not only the mechanical process but also the horticultural principles that ensure the tree’s healthy establishment and long-term success. The six photo-realistic panels are arranged in a sequence that emphasizes clarity and precision, each one capturing a vital stage in the planting process. Together, they illustrate the importance of preparation, handling, positioning, and aftercare, creating a comprehensive lesson that any gardener—from novice to experienced—can follow with confidence.
The sequence begins with the foundational task: digging the planting hole. The image shows a spade breaking into the earth, creating a cavity that is intentionally wide but not excessively deep. This crucial detail underscores a key principle of tree planting: the hole should be twice as broad as the root ball to allow lateral root expansion, but no deeper than the root ball’s height. This prevents the tree from being set too low, which could lead to suffocation of roots and trunk rot over time. The loose soil at the edges of the hole creates an inviting environment for new roots to spread outward, anchoring the tree securely in its new home.
The second panel highlights the careful handling of the young maple as it is removed from its container. The root ball, compact yet fragile, is lifted gently by hand. Here, the emphasis is on loosening circling roots, a step that prevents the tree from becoming root-bound, where roots continue to grow in constricted circles rather than spreading into the soil. By teasing them outward, the gardener gives the tree a greater chance to establish a healthy, natural root system, which is the foundation for its stability and growth.
In the third image, the tree is placed into the prepared hole. Special attention is drawn to the root flare—the area where the trunk widens at the base. This flare must sit slightly above ground level, a subtle but critical positioning that ensures the tree will breathe properly and avoid moisture buildup against the trunk. Planting too deeply is one of the most common mistakes in tree planting, and this step demonstrates how to avoid it with precision.
Once the tree is positioned correctly, the fourth panel shows soil being backfilled around the root ball. Importantly, the instruction specifies the use of native soil, avoiding amendments or additives that could create artificial conditions around the roots. By using the same soil that surrounds the planting site, the tree is encouraged to adapt naturally to its environment, preventing it from becoming dependent on enriched soil that ends abruptly at the edge of the hole. This helps ensure steady and uniform growth as roots expand outward.
The fifth stage introduces water as an essential element of establishment. A shallow basin is shaped around the base of the tree, creating a reservoir that directs water into the root zone rather than letting it run off. The image shows water being poured thoroughly into this basin, saturating the soil and helping to eliminate air pockets that may have formed during backfilling. This initial deep watering anchors the soil around the roots and provides the young tree with the moisture it needs to begin acclimating to its new environment.
The sequence concludes with the application of mulch, as depicted in the sixth image. A layer of organic mulch, two to three inches thick, is spread in a neat circle around the tree. The mulch conserves moisture, moderates soil temperature, and suppresses weeds, all of which contribute to the tree’s health during its vulnerable first years. Care is taken to keep the mulch pulled back from the trunk itself, leaving a small gap around the base. This prevents rot and discourages pests, ensuring that the tree’s bark remains dry and intact. The result is a tidy, protective ring that completes the planting process.
Altogether, this instructional composition serves not only as a practical manual but also as a visual affirmation of best practices in horticulture. By following these steps—preparing the soil properly, handling roots with care, positioning the tree correctly, backfilling wisely, watering deeply, and mulching appropriately—gardeners create the conditions for young maples, or any trees, to thrive for decades to come. The clarity of each image, paired with the sequence of tasks, captures the balance of science and artistry inherent in planting a tree, transforming what might seem like a simple chore into an act of cultivation that ensures life and beauty for generations.
The image is related to: The Best Maple Trees to Plant in Your Garden: A Guide to Species Selection

